How to Upload a Vhd to Vmware
This browser is no longer supported.
Upgrade to Microsoft Border to take advantage of the latest features, security updates, and technical back up.
Prepare a Windows VHD or VHDX to upload to Azure
Applies to: ✔️ Windows VMs
Before y'all upload a Windows virtual machine (VM) from on-bounds to Azure, you must prepare the virtual hard disk (VHD or VHDX). Azure supports both generation 1 and generation 2 VMs that are in VHD file format and that have a stock-still-size disk. The maximum size allowed for the OS VHD on a generation 1 VM is 2 TB.
Y'all can convert a VHDX file to VHD, convert a dynamically expanding disk to a fixed-size deejay, only you can't alter a VM's generation. For more than information, see Should I create a generation 1 or 2 VM in Hyper-V? and Support for generation 2 VMs on Azure.
For data about the support policy for Azure VMs, see Microsoft server software support for Azure VMs.
Notation
The instructions in this article apply to:
- The 64-bit version of Windows Server 2008 R2 and subsequently Windows Server operating systems. For information near running a 32-bit operating system in Azure, meet Support for 32-flake operating systems in Azure VMs.
- If any Disaster Recovery tool will be used to migrate the workload, similar Azure Site Recovery or Azure Migrate, this process is still required on the Invitee OS to prepare the image before the migration.
System File Checker
Run Windows Organization File Checker utility before generalization of Bone image
The Arrangement File Checker (SFC) is used to verify and replace Windows organization files.
Important
Use an elevated PowerShell session to run the examples in this article.
Run the SFC control:
sfc.exe /scannow Kickoff arrangement scan. This process volition take some time. Start verification phase of system scan. Verification 100% complete. Windows Resource Protection did non observe whatsoever integrity violations. Afterward the SFC scan completes, install Windows Updates and restart the computer.
Set Windows configurations for Azure
Note
Azure platform mounts an ISO file to the DVD-ROM when a Windows VM is created from a generalized image. For this reason, the DVD-ROM must be enabled in the OS in the generalized image. If it is disabled, the Windows VM will exist stuck at out-of-box experience (OOBE).
-
Remove whatever static persistent routes in the routing table:
- To view the routing table, run
route.exe print. - Check the Persistence Routes section. If in that location's a persistent route, apply the
route.exe deletecommand to remove it.
- To view the routing table, run
-
Remove the WinHTTP proxy:
netsh.exe winhttp reset proxyIf the VM needs to piece of work with a specific proxy, add a proxy exception for the Azure IP accost (168.63.129.16) then the VM can connect to Azure:
$proxyAddress='<your proxy server>' $proxyBypassList='<your list of bypasses>;168.63.129.sixteen' netsh.exe winhttp set proxy $proxyAddress $proxyBypassList -
Open DiskPart:
diskpart.exePrepare the disk SAN policy to
Onlineall:DISKPART> san policy=onlineall DISKPART> exit -
Prepare Coordinated Universal Time (UTC) time for Windows. Likewise, set the startup type of the Windows time service w32time to Automatic:
Set-ItemProperty -Path HKLM:\Organization\CurrentControlSet\Control\TimeZoneInformation -Proper name RealTimeIsUniversal -Value i -Blazon DWord -Strength Set-Service -Name w32time -StartupType Automated -
Set the power profile to high performance:
powercfg.exe /setactive SCHEME_MIN -
Make sure the ecology variables TEMP and TMP are ready to their default values:
Set-ItemProperty -Path 'HKLM:\SYSTEM\CurrentControlSet\Control\Session Manager\Environment' -Name TEMP -Value "%SystemRoot%\TEMP" -Type ExpandString -Force Set-ItemProperty -Path 'HKLM:\Organisation\CurrentControlSet\Control\Session Manager\Environment' -Name TMP -Value "%SystemRoot%\TEMP" -Blazon ExpandString -Force -
For VMs with legacy operating systems (Windows Server 2012 R2 or Windows 8.one and below), make sure the latest Hyper-V Integration Component Services are installed. For more information, see Hyper-V integration components update for Windows VM.
Note
In a scenario where VMs are to be set up with a disaster recovery solution betwixt the on-premise VMware server and Azure, the Hyper-V Integration Component Services can't be used. If that's the example, please contact the VMware support to migrate the VM to Azure and get in co-reside in VMware server.
Check the Windows services
Make certain that each of the following Windows services is gear up to the Windows default value. These services are the minimum that must be configured to ensure VM connectivity. To set the startup settings, run the following case:
Get-Service -Name BFE, Dhcp, Dnscache, IKEEXT, iphlpsvc, nsi, mpssvc, RemoteRegistry | Where-Object StartType -ne Automated | Set-Service -StartupType Automatic Get-Service -Proper noun Netlogon, Netman, TermService | Where-Object StartType -ne Transmission | Gear up-Service -StartupType Transmission Update remote desktop registry settings
Make sure the following settings are configured correctly for remote admission:
Annotation
If you receive an error bulletin when running Prepare-ItemProperty -Path 'HKLM:\SOFTWARE\Policies\Microsoft\Windows NT\Last Services -Name <string> -Value <object>, you tin can safely ignore information technology. It ways the domain isn't setting that configuration through a Group Policy Object.
-
Remote Desktop Protocol (RDP) is enabled:
Set-ItemProperty -Path 'HKLM:\Arrangement\CurrentControlSet\Control\Final Server' -Proper name fDenyTSConnections -Value 0 -Type DWord -Forcefulness Set-ItemProperty -Path 'HKLM:\SOFTWARE\Policies\Microsoft\Windows NT\Terminal Services' -Name fDenyTSConnections -Value 0 -Type DWord -Force -
The RDP port is prepare correctly using the default port of 3389:
Set-ItemProperty -Path 'HKLM:\System\CurrentControlSet\Control\Terminal Server\Winstations\RDP-Tcp' -Name PortNumber -Value 3389 -Blazon DWord -ForceWhen you deploy a VM, the default rules are created for port 3389. To change the port number, do that after the VM is deployed in Azure.
-
The listener is listening on every network interface:
Gear up-ItemProperty -Path 'HKLM:\Organization\CurrentControlSet\Control\Concluding Server\Winstations\RDP-Tcp' -Name LanAdapter -Value 0 -Blazon DWord -Force -
Configure network-level hallmark (NLA) mode for the RDP connections:
Ready-ItemProperty -Path 'HKLM:\Organisation\CurrentControlSet\Control\Terminal Server\WinStations\RDP-Tcp' -Name UserAuthentication -Value 1 -Type DWord -Force -
Set the go on-alive value:
Set-ItemProperty -Path 'HKLM:\SOFTWARE\Policies\Microsoft\Windows NT\Terminal Services' -Name KeepAliveEnable -Value i -Type DWord -Force Gear up-ItemProperty -Path 'HKLM:\SOFTWARE\Policies\Microsoft\Windows NT\Terminal Services' -Proper noun KeepAliveInterval -Value 1 -Type DWord -Force Set up-ItemProperty -Path 'HKLM:\SYSTEM\CurrentControlSet\Control\Terminal Server\Winstations\RDP-Tcp' -Name KeepAliveTimeout -Value one -Type DWord -Force -
Fix the reconnect options:
Set-ItemProperty -Path 'HKLM:\SOFTWARE\Policies\Microsoft\Windows NT\Terminal Services' -Proper noun fDisableAutoReconnect -Value 0 -Type DWord -Force Gear up-ItemProperty -Path 'HKLM:\SYSTEM\CurrentControlSet\Control\Terminal Server\Winstations\RDP-Tcp' -Name fInheritReconnectSame -Value 1 -Blazon DWord -Forcefulness Set-ItemProperty -Path 'HKLM:\SYSTEM\CurrentControlSet\Command\Terminal Server\Winstations\RDP-Tcp' -Name fReconnectSame -Value 0 -Type DWord -Force -
Limit the number of concurrent connections:
Prepare-ItemProperty -Path 'HKLM:\SYSTEM\CurrentControlSet\Command\Terminal Server\Winstations\RDP-Tcp' -Proper noun MaxInstanceCount -Value 4294967295 -Blazon DWord -Strength -
Remove any self-signed certificates tied to the RDP listener:
if ((Get-Item -Path 'HKLM:\SYSTEM\CurrentControlSet\Command\Terminal Server\WinStations\RDP-Tcp').Property -contains 'SSLCertificateSHA1Hash') { Remove-ItemProperty -Path 'HKLM:\System\CurrentControlSet\Control\Terminal Server\WinStations\RDP-Tcp' -Proper noun SSLCertificateSHA1Hash -Forcefulness }This code ensures that you can connect when you deploy the VM. You can also review these settings subsequently the VM is deployed in Azure.
-
If the VM is part of a domain, cheque the following policies to make sure the previous settings aren't reverted.
Goal Policy Value RDP is enabled Computer Configuration\Policies\Windows Settings\Authoritative Templates\Components\Remote Desktop Services\Remote Desktop Session Host\Connections Allow users to connect remotely by using Remote Desktop NLA group policy Settings\Administrative Templates\Components\Remote Desktop Services\Remote Desktop Session Host\Security Require user authentication for remote access by using NLA Keep-alive settings Computer Configuration\Policies\Windows Settings\Administrative Templates\Windows Components\Remote Desktop Services\Remote Desktop Session Host\Connections Configure proceed-alive connection interval Reconnect settings Computer Configuration\Policies\Windows Settings\Authoritative Templates\Windows Components\Remote Desktop Services\Remote Desktop Session Host\Connections Reconnect automatically Limited number of connexion settings Figurer Configuration\Policies\Windows Settings\Administrative Templates\Windows Components\Remote Desktop Services\Remote Desktop Session Host\Connections Limit number of connections
Configure Windows Firewall rules
-
Turn on Windows Firewall on the 3 profiles (domain, standard, and public):
Set-NetFirewallProfile -Contour Domain, Public, Individual -Enabled True -
Run the following case to allow WinRM through the 3 firewall profiles (domain, private, and public), and enable the PowerShell remote service:
Enable-PSRemoting -Force Gear up-NetFirewallRule -Proper noun WINRM-HTTP-In-TCP, WINRM-HTTP-In-TCP-PUBLIC -Enabled True -
Enable the following firewall rules to let the RDP traffic:
Set-NetFirewallRule -Group '@FirewallAPI.dll,-28752' -Enabled Truthful -
Enable the dominion for file and printer sharing and so the VM can respond to ping requests inside the virtual network:
Prepare-NetFirewallRule -Name FPS-ICMP4-ERQ-In -Enabled True -
Create a dominion for the Azure platform network:
New-NetFirewallRule -DisplayName AzurePlatform -Direction Inbound -RemoteAddress 168.63.129.xvi -Profile Any -Action Let -EdgeTraversalPolicy Allow New-NetFirewallRule -DisplayName AzurePlatform -Direction Outbound -RemoteAddress 168.63.129.16 -Profile Whatsoever -Activity Allow -
If the VM is function of a domain, check the following Azure Advertizement policies to brand sure the previous settings aren't reverted.
Goal Policy Value Enable the Windows Firewall profiles Estimator Configuration\Policies\Windows Settings\Administrative Templates\Network\Network Connection\Windows Firewall\Domain Profile\Windows Firewall Protect all network connections Enable RDP Computer Configuration\Policies\Windows Settings\Authoritative Templates\Network\Network Connection\Windows Firewall\Domain Profile\Windows Firewall Allow inbound Remote Desktop exceptions Reckoner Configuration\Policies\Windows Settings\Administrative Templates\Network\Network Connection\Windows Firewall\Standard Profile\Windows Firewall Let inbound Remote Desktop exceptions Enable ICMP-V4 Computer Configuration\Policies\Windows Settings\Administrative Templates\Network\Network Connection\Windows Firewall\Domain Profile\Windows Firewall Allow ICMP exceptions Figurer Configuration\Policies\Windows Settings\Authoritative Templates\Network\Network Connection\Windows Firewall\Standard Profile\Windows Firewall Permit ICMP exceptions
Verify the VM
Make sure the VM is healthy, secure, and RDP accessible:
-
To make certain the disk is good for you and consequent, check the deejay at the next VM restart:
chkdsk.exe /fBrand sure the report shows a clean and healthy disk.
-
Set the Boot Configuration Data (BCD) settings.
cmd bcdedit.exe /set "{bootmgr}" integrityservices enable bcdedit.exe /set "{default}" device partition=C: bcdedit.exe /set "{default}" integrityservices enable bcdedit.exe /set "{default}" recoveryenabled Off bcdedit.exe /set "{default}" osdevice partition=C: bcdedit.exe /set "{default}" bootstatuspolicy IgnoreAllFailures #Enable Serial Console Feature bcdedit.exe /ready "{bootmgr}" displaybootmenu yes bcdedit.exe /set "{bootmgr}" timeout 5 bcdedit.exe /set up "{bootmgr}" bootems yeah bcdedit.exe /ems "{current}" ON bcdedit.exe /emssettings EMSPORT:1 EMSBAUDRATE:115200 exit -
The dump log tin can be helpful in troubleshooting Windows crash bug. Enable the dump log drove:
# Gear up the invitee OS to collect a kernel dump on an Os crash upshot Prepare-ItemProperty -Path 'HKLM:\SYSTEM\CurrentControlSet\Control\CrashControl' -Name CrashDumpEnabled -Type DWord -Forcefulness -Value ii Ready-ItemProperty -Path 'HKLM:\SYSTEM\CurrentControlSet\Control\CrashControl' -Name DumpFile -Type ExpandString -Force -Value "%SystemRoot%\MEMORY.DMP" Set-ItemProperty -Path 'HKLM:\Organization\CurrentControlSet\Control\CrashControl' -Name NMICrashDump -Type DWord -Strength -Value one # Set up the guest OS to collect user mode dumps on a service crash event $central = 'HKLM:\SOFTWARE\Microsoft\Windows\Windows Error Reporting\LocalDumps' if ((Examination-Path -Path $cardinal) -eq $faux) {(New-Item -Path 'HKLM:\SOFTWARE\Microsoft\Windows\Windows Error Reporting' -Proper name LocalDumps)} New-ItemProperty -Path $key -Name DumpFolder -Type ExpandString -Strength -Value 'C:\CrashDumps' New-ItemProperty -Path $primal -Name CrashCount -Blazon DWord -Force -Value x New-ItemProperty -Path $key -Proper name DumpType -Type DWord -Force -Value 2 Set-Service -Name WerSvc -StartupType Manual -
Verify that the Windows Management Instrumentation (WMI) repository is consistent:
winmgmt.exe /verifyrepositoryIf the repository is corrupted, come across WMI: Repository corruption or not.
-
Brand sure no other applications than TermService are using port 3389. This port is used for the RDP service in Azure. To come across which ports are used on the VM, run
netstat.exe -anob:netstat.exe -anobThe following is an example.
netstat.exe -anob | findstr 3389 TCP 0.0.0.0:3389 0.0.0.0:0 LISTENING 4056 TCP [::]:3389 [::]:0 LISTENING 4056 UDP 0.0.0.0:3389 *:* 4056 UDP [::]:3389 *:* 4056 tasklist /svc | findstr 4056 svchost.exe 4056 TermService -
To upload a Windows VHD that's a domain controller:
-
Follow these extra steps to prepare the disk.
-
Make sure you know the Directory Services Restore Mode (DSRM) countersign in case you ever take to start the VM in DSRM. For more information, see Set a DSRM password.
-
-
Brand certain you know the built-in administrator account and password. Yous might desire to reset the electric current local administrator password and make sure you can utilise this business relationship to sign in to Windows through the RDP connection. This admission permission is controlled by the "Allow log on through Remote Desktop Services" Grouping Policy Object. View this object in the Local Group Policy Editor:
-
Computer Configuration\Windows Settings\Security Settings\Local Policies\User Rights Assignment
-
-
Cheque the following Azure AD policies to make sure they're not blocking RDP access:
-
Estimator Configuration\Windows Settings\Security Settings\Local Policies\User Rights Assignment\Deny admission to this computer from the network -
Computer Configuration\Windows Settings\Security Settings\Local Policies\User Rights Assignment\Deny log on through Remote Desktop Services
-
-
Check the following Azure Advertisement policy to make sure they're not removing any of the required access accounts:
-
Computer Configuration\Windows Settings\Security Settings\Local Policies\User Rights Assignment\Access this computer from the network
The policy should listing the following groups:
-
Administrators
-
Backup Operators
-
Everyone
-
Users
-
-
Restart the VM to make certain that Windows is still good for you and can be reached through the RDP connection. At this bespeak, consider creating a VM on your local Hyper-V server to make sure the VM starts completely. Then examination to make certain yous can reach the VM through RDP.
-
Remove any actress Transport Driver Interface (TDI) filters. For example, remove software that analyzes TCP packets or extra firewalls.
-
Uninstall any other tertiary-political party software or commuter that'due south related to physical components or any other virtualization technology.
Install Windows updates
Note
If you also need to do a generalization of the Bone (sysprep), you must update Windows and restart the VM before running the Sysprep command.
Ideally, you should keep the machine updated to the patch level, if this isn't possible, make sure the post-obit updates are installed. To get the latest updates, see the Windows update history pages: Windows 10, and Windows Server 2019, Windows 8.1, and Windows Server 2012 R2 and Windows vii SP1, and Windows Server 2008 R2 SP1.
| Component | Binary | Windows 7 SP1, Windows Server 2008 R2 SP1 | Windows 8, Windows Server 2012 | Windows viii.one, Windows Server 2012 R2 | Windows 10 v1607, Windows Server 2016 v1607 | Windows 10 v1703 | Windows 10 v1709, Windows Server 2016 v1709 | Windows 10 v1803, Windows Server 2016 v1803 |
|---|---|---|---|---|---|---|---|---|
| Storage | disk.sys | 6.1.7601.23403 - KB3125574 | vi.2.9200.17638 / half-dozen.ii.9200.21757 - KB3137061 | six.iii.9600.18203 - KB3137061 | - | - | - | - |
| storport.sys | 6.1.7601.23403 - KB3125574 | vi.2.9200.17188 / 6.two.9200.21306 - KB3018489 | 6.3.9600.18573 - KB4022726 | 10.0.14393.1358 - KB4022715 | 10.0.15063.332 | - | - | |
| ntfs.sys | 6.1.7601.23403 - KB3125574 | 6.two.9200.17623 / 6.2.9200.21743 - KB3121255 | half dozen.iii.9600.18654 - KB4022726 | 10.0.14393.1198 - KB4022715 | x.0.15063.447 | - | - | |
| Iologmsg.dll | vi.1.7601.23403 - KB3125574 | 6.2.9200.16384 - KB2995387 | - | - | - | - | - | |
| Classpnp.sys | half-dozen.one.7601.23403 - KB3125574 | six.2.9200.17061 / vi.two.9200.21180 - KB2995387 | 6.3.9600.18334 - KB3172614 | ten.0.14393.953 - KB4022715 | - | - | - | |
| Volsnap.sys | 6.1.7601.23403 - KB3125574 | 6.ii.9200.17047 / vi.two.9200.21165 - KB2975331 | 6.three.9600.18265 - KB3145384 | - | 10.0.15063.0 | - | - | |
| partmgr.sys | 6.1.7601.23403 - KB3125574 | half-dozen.2.9200.16681 - KB2877114 | 6.3.9600.17401 - KB3000850 | 10.0.14393.953 - KB4022715 | 10.0.15063.0 | - | - | |
| volmgr.sys | ten.0.15063.0 | - | - | |||||
| Volmgrx.sys | vi.1.7601.23403 - KB3125574 | - | - | - | 10.0.15063.0 | - | - | |
| Msiscsi.sys | 6.1.7601.23403 - KB3125574 | 6.two.9200.21006 - KB2955163 | vi.3.9600.18624 - KB4022726 | 10.0.14393.1066 - KB4022715 | x.0.15063.447 | - | - | |
| Msdsm.sys | half-dozen.ane.7601.23403 - KB3125574 | 6.ii.9200.21474 - KB3046101 | vi.3.9600.18592 - KB4022726 | - | - | - | - | |
| Mpio.sys | half-dozen.1.7601.23403 - KB3125574 | 6.2.9200.21190 - KB3046101 | half-dozen.iii.9600.18616 - KB4022726 | ten.0.14393.1198 - KB4022715 | - | - | - | |
| vmstorfl.sys | six.three.9600.18907 - KB4072650 | 6.3.9600.18080 - KB3063109 | 6.3.9600.18907 - KB4072650 | 10.0.14393.2007 - KB4345418 | 10.0.15063.850 - KB4345419 | x.0.16299.371 - KB4345420 | - | |
| Fveapi.dll | 6.1.7601.23311 - KB3125574 | 6.2.9200.20930 - KB2930244 | six.3.9600.18294 - KB3172614 | 10.0.14393.576 - KB4022715 | - | - | - | |
| Fveapibase.dll | 6.i.7601.23403 - KB3125574 | 6.2.9200.20930 - KB2930244 | 6.3.9600.17415 - KB3172614 | 10.0.14393.206 - KB4022715 | - | - | - | |
| Network | netvsc.sys | - | - | - | 10.0.14393.1198 - KB4022715 | ten.0.15063.250 - KB4020001 | - | - |
| mrxsmb10.sys | half-dozen.1.7601.23816 - KB4022722 | 6.ii.9200.22108 - KB4022724 | 6.3.9600.18603 - KB4022726 | ten.0.14393.479 - KB4022715 | ten.0.15063.483 | - | - | |
| mrxsmb20.sys | 6.ane.7601.23816 - KB4022722 | vi.2.9200.21548 - KB4022724 | 6.3.9600.18586 - KB4022726 | ten.0.14393.953 - KB4022715 | 10.0.15063.483 | - | - | |
| mrxsmb.sys | half dozen.one.7601.23816 - KB4022722 | 6.two.9200.22074 - KB4022724 | 6.3.9600.18586 - KB4022726 | 10.0.14393.953 - KB4022715 | 10.0.15063.0 | - | - | |
| tcpip.sys | half dozen.1.7601.23761 - KB4022722 | 6.2.9200.22070 - KB4022724 | six.iii.9600.18478 - KB4022726 | 10.0.14393.1358 - KB4022715 | 10.0.15063.447 | - | - | |
| http.sys | 6.1.7601.23403 - KB3125574 | six.2.9200.17285 - KB3042553 | 6.3.9600.18574 - KB4022726 | x.0.14393.251 - KB4022715 | 10.0.15063.483 | - | - | |
| vmswitch.sys | 6.1.7601.23727 - KB4022719 | six.2.9200.22117 - KB4022724 | 6.3.9600.18654 - KB4022726 | 10.0.14393.1358 - KB4022715 | 10.0.15063.138 | - | - | |
| Cadre | ntoskrnl.exe | 6.1.7601.23807 - KB4022719 | 6.2.9200.22170 - KB4022718 | 6.3.9600.18696 - KB4022726 | 10.0.14393.1358 - KB4022715 | 10.0.15063.483 | - | - |
| Remote Desktop Services | rdpcorets.dll | six.2.9200.21506 - KB4022719 | 6.2.9200.22104 - KB4022724 | 6.3.9600.18619 - KB4022726 | ten.0.14393.1198 - KB4022715 | 10.0.15063.0 | - | - |
| termsrv.dll | six.1.7601.23403 - KB3125574 | vi.2.9200.17048 - KB2973501 | 6.3.9600.17415 - KB3000850 | 10.0.14393.0 - KB4022715 | 10.0.15063.0 | - | - | |
| termdd.sys | 6.1.7601.23403 - KB3125574 | - | - | - | - | - | - | |
| win32k.sys | 6.1.7601.23807 - KB4022719 | 6.2.9200.22168 - KB4022718 | vi.3.9600.18698 - KB4022726 | ten.0.14393.594 - KB4022715 | - | - | - | |
| rdpdd.dll | 6.ane.7601.23403 - KB3125574 | - | - | - | - | - | - | |
| rdpwd.sys | half-dozen.i.7601.23403 - KB3125574 | - | - | - | - | - | - | |
| Security | MS17-010 | KB4012212 | KB4012213 | KB4012213 | KB4012606 | KB4012606 | - | - |
| KB4012216 | KB4013198 | KB4013198 | - | - | ||||
| KB4012215 | KB4012214 | KB4012216 | KB4013429 | KB4013429 | - | - | ||
| KB4012217 | KB4013429 | KB4013429 | - | - | ||||
| CVE-2018-0886 | KB4103718 | KB4103730 | KB4103725 | KB4103723 | KB4103731 | KB4103727 | KB4103721 | |
| KB4103712 | KB4103726 | KB4103715 |
Note
To avoid an adventitious reboot during VM provisioning, nosotros recommend ensuring that all Windows Update installations are finished and that no updates are pending. One style to do this is to install all possible Windows updates and reboot once before y'all run the sysprep.exe control.
Determine when to use Sysprep
Arrangement Training Tool (sysprep.exe) is a process you can run to reset a Windows installation. Sysprep provides an "out of the box" feel past removing all personal data and resetting several components.
Yous typically run sysprep.exe to create a template from which you can deploy several other VMs that have a specific configuration. The template is chosen a generalized image.
To create merely one VM from i disk, you don't have to use Sysprep. Instead, you tin create the VM from a specialized epitome. For data near how to create a VM from a specialized disk, see:
- Create a VM from a specialized disk
- Create a VM from a specialized VHD disk
To create a generalized image, you need to run Sysprep. For more information, see How to use Sysprep: An introduction.
Not every part or application that's installed on a Windows-based computer supports generalized images. Before you use this procedure, make sure Sysprep supports the office of the computer. For more than information, see Sysprep support for server roles.
In particular, Sysprep requires the drives to be fully decrypted earlier execution. If you lot take enabled encryption on your VM, disable it before running Sysprep.
Generalize a VHD
Note
If you're creating a generalized image from an existing Azure VM, we recommend to remove the VM extensions earlier running the sysprep.
Note
After you run sysprep.exe in the following steps, turn off the VM. Don't plow information technology back on until you lot create an image from it in Azure.
-
Sign in to the Windows VM.
-
Run a PowerShell session every bit an ambassador.
-
Delete the panther directory (C:\Windows\Panther).
-
Alter the directory to
%windir%\system32\sysprep. Then runsysprep.exe. -
In the System Preparation Tool dialog box, select Enter System Out-of-Box Feel (OOBE), and make certain the Generalize checkbox is selected.
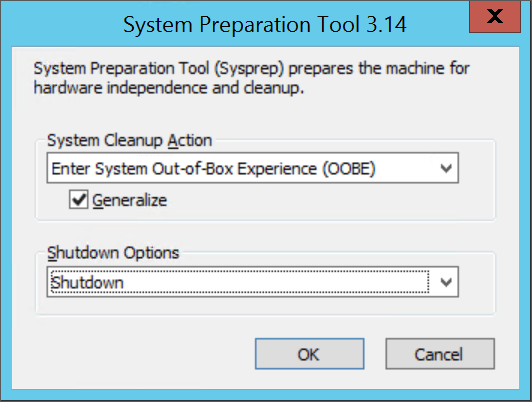
-
In Shutdown Options, select Shutdown.
-
Select OK.
-
When Sysprep finishes, shut down the VM. Don't utilize Restart to close down the VM.
Now the VHD is set up to exist uploaded. For more information nearly how to create a VM from a generalized deejay, see Upload a generalized VHD and utilize it to create a new VM in Azure.
Convert the virtual disk to a stock-still size VHD
Use one of the methods in this section to catechumen and resize your virtual disk to the required format for Azure:
-
Support the VM earlier yous run the virtual deejay conversion or resize process.
-
Brand sure that the Windows VHD works correctly on the local server. Resolve any errors within the VM itself before you lot try to catechumen or upload information technology to Azure.
-
Convert the virtual disk to blazon stock-still.
-
Resize the virtual disk to meet Azure requirements:
-
Disks in Azure must accept a virtual size aligned to 1 MiB. If your VHD is a fraction of one MiB, you'll need to resize the disk to a multiple of ane MiB. Disks that are fractions of a MiB cause errors when creating images from the uploaded VHD. To verify the size you lot tin employ the PowerShell Get-VHD cmdlet to show "Size", which must be a multiple of ane MiB in Azure, and "FileSize", which volition be equal to "Size" plus 512 bytes for the VHD footer.
$vhd = Get-VHD -Path C:\exam\MyNewVM.vhd $vhd.Size % 1MB 0 $vhd.FileSize - $vhd.Size 512 -
The maximum size allowed for the Os VHD with a generation 1 VM is ii,048 GiB (2 TiB),
-
The maximum size for a information disk is 32,767 GiB (32 TiB).
-
Note
- If you are preparing a Windows Bone disk after you convert to a stock-still deejay and resize if needed, create a VM that uses the deejay. Start and sign in to the VM and continue with the sections in this article to finish preparing it for uploading.
- If you are preparing a information deejay yous may stop with this section and proceed to uploading your disk.
Use Hyper-V Manager to catechumen the deejay
- Open Hyper-V Managing director and select your local figurer on the left. In the menu in a higher place the computer listing, select Action > Edit Disk.
- On the Locate Virtual Difficult Disk page, select your virtual deejay.
- On the Choose Activity page, select Convert > Next.
- To catechumen from VHDX, select VHD > Next.
- To convert from a dynamically expanding disk, select Stock-still size > Next.
- Locate and select a path to save the new VHD file.
- Select Finish.
Use PowerShell to convert the deejay
You tin can convert a virtual deejay using the Convert-VHD cmdlet in PowerShell. If you need information about installing this cmdlet see Install the Hyper-V function.
The following example converts the deejay from VHDX to VHD. Information technology too converts the disk from a dynamically expanding deejay to a stock-still-size disk.
Convert-VHD -Path C:\test\MyVM.vhdx -DestinationPath C:\test\MyNewVM.vhd -VHDType Stock-still In this example, supplant the value for Path with the path to the virtual hard disk that you desire to convert. Replace the value for DestinationPath with the new path and proper noun of the converted disk.
Utilize Hyper-V Manager to resize the disk
- Open up Hyper-V Manager and select your local computer on the left. In the carte du jour above the estimator list, select Action > Edit Disk.
- On the Locate Virtual Hd page, select your virtual disk.
- On the Cull Activeness folio, select Expand > Next.
- On the Locate Virtual Difficult Deejay page, enter the new size in GiB > Side by side.
- Select Finish.
Use PowerShell to resize the disk
You tin resize a virtual disk using the Resize-VHD cmdlet in PowerShell. If you lot need information most installing this cmdlet meet Install the Hyper-5 role.
The post-obit example resizes the disk from 100.5 MiB to 101 MiB to meet the Azure alignment requirement.
Resize-VHD -Path C:\exam\MyNewVM.vhd -SizeBytes 105906176 In this example, replace the value for Path with the path to the virtual hard disk that you lot want to resize. Replace the value for SizeBytes with the new size in bytes for the disk.
Convert from VMware VMDK deejay format
If you have a Windows VM prototype in the VMDK file format, then yous tin utilise Azure Drift to convert the VMDK and upload it to Azure.
Complete the recommended configurations
The post-obit settings don't affect VHD uploading. However, nosotros strongly recommend that y'all configured them.
-
Install the Azure Virtual Machine Agent. And so you tin enable VM extensions. The VM extensions implement nearly of the critical functionality that you might desire to use with your VMs. Y'all'll need the extensions, for example, to reset passwords or configure RDP. For more than information, see the Azure Virtual Machine Agent overview.
-
After you create the VM in Azure, nosotros recommend that y'all put the page file on the temporal drive volume to amend operation. Y'all tin can prepare the file placement as follows:
Set-ItemProperty -Path 'HKLM:\System\CurrentControlSet\Control\Session Manager\Retentivity Management' -Name PagingFiles -Value 'D:\pagefile.sys' -Type MultiString -ForceIf a data disk is fastened to the VM, the temporal drive volume'due south letter is typically D. This designation could be different, depending on your settings and the number of bachelor drives.
- We recommend disabling script blockers that might be provided by antivirus software. They might interfere and cake the Windows Provisioning Agent scripts executed when you lot deploy a new VM from your image.
Next steps
- Upload a Windows VM prototype to Azure for Resource Manager deployments
- Troubleshoot Azure Windows VM activation issues
Feedback
Submit and view feedback for
Source: https://docs.microsoft.com/en-us/azure/virtual-machines/windows/prepare-for-upload-vhd-image